A network printer is a great advantage for users, since it avoids moving equipment from site to each moment, and can be used from different computers that they have in their home or office. Configuring the network printer will facilitate the work and in this article we will talk about ¿how to connect a network printer?

How to connect a network printer?
A printer is one of the most used external devices in an office, however, its use demands to propose the most appropriate way to use it among all the users involved. First, it must be considered, the place and space where it will be installed, that there is no obstruction in the cooling system or the printer's crevices.
Likewise, it is recommended that at the time of installation the type of electrical current indicated by the printer manufacturer is used and also the power cord provided by the commercial company. If the user does not knowhow to connect a network printer?, it is best to seek support or technical help.
Likewise, the power cord must be for the exclusive use of the printer, as using it in another device could cause an electric shock and damage the cord. It must be verified that the AC power cord is within the local safety regulations.
Manufacturers recommend not using outlets where other devices such as air conditioning or copier are connected that must be reset frequently. And do not use plugs that are controlled by switches or timers.
You may be interested in reading about Communication ports from the computer.
Experts recommend placing the computer away from possible sources of magnetic interference, such as speakers or cordless phones, or using cables in poor condition, and if you use a cable that is extended, you must ensure that the total amperes of the components connected to it extension is not greater than the capacity of the cable.
Finally, always seek technical support, if the printer or one of its components suffers a serious breakdown, to avoid irreversible damage to them.
Installation and connection
One of the most relevant aspects to install a network system in the home or office, is that you can make prints from any computer that is within this network, for this reason a network printer is required and know whathow to connect a network printer?
In such a way, that we avoid constantly moving the computer or the printer from places to make the connection through cable, in the same way, that it is avoided to mobilize the computer where the printer was installed to be able to print any document and thus avoid any damage to both equipments by unwanted accidents.
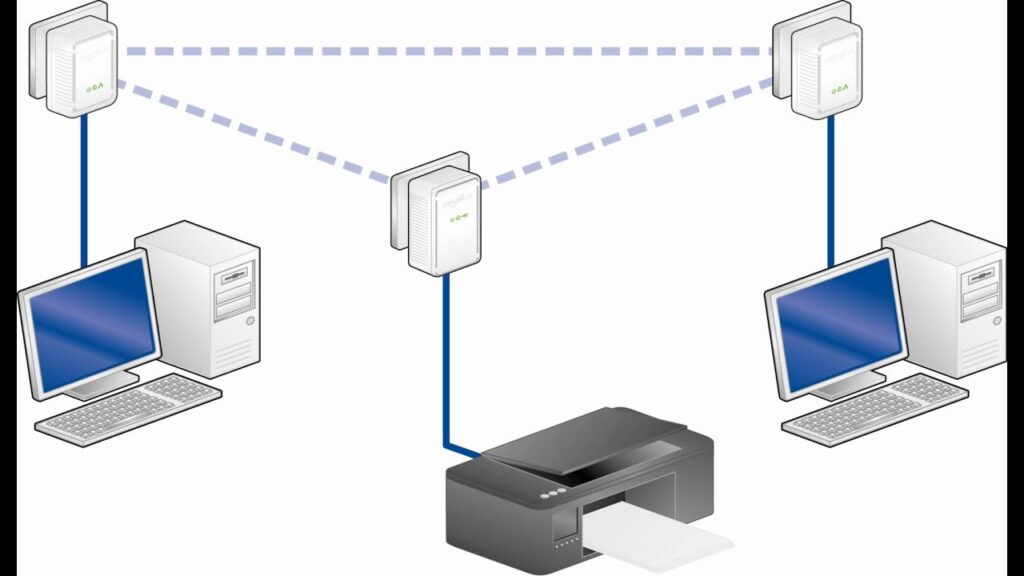
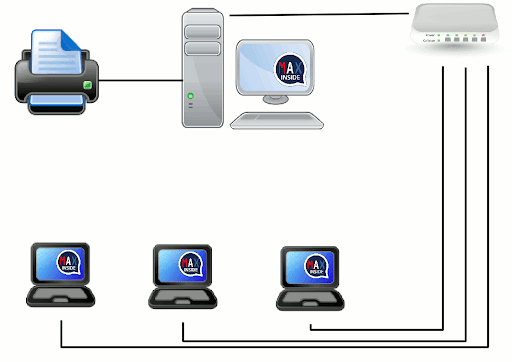
The first thing is the installation and connection of the printer, in such a way that we must verify that the printer can have a connection to the network, to establish if it was done, through an Ethernet cable or if it connected via wireless.
How to connect a network printer via Ethernet cable?
The following is the procedure for ¿how to connect a printer? With cable:
-
The printer must first be located in close proximity to the router or router.
-
Then, make the connection of the printer to the router through the cable.
-
It is recommended to restart the router when the printer is connecting, so that the device can be added successfully.
-
When the printer, proceed to turn on both devices (router and printer), so the router will automatically recognize the printer.

¿How to connect a printer in wireless network?
This section presents the steps to follow for cHow to connect a printer on a wireless network:
- You should check the specifications of the printer, to see if it can be done.
- Then turn on the printer and select "Wireless LAN Connection".
- Make the printer connection to the network.
- Finally, enter the key or password when required by the system.
You may also be interested in reading about Types of Buses in Computer Science and its Function.

Configuration
This stage is done from the computer. When you start it, you should find the printer and computer settings. You must follow the following procedure to achieve it:
-
Open the "Settings" folder inside the computer.
-
You must select "Control Panel".
-
Enter the option "Hardware and sound".
-
Then search for "View devices and printers."
-
Finally, give the option "Add a new printer", so that the computer begins to search through the network, either wirelessly or by cable, for new devices or components.
-
After a few minutes, the devices that were found will be seen on the screen, the preferred printer is selected and "Next" is clicked.
Share the printer on the network
After the printer has been installed and configured correctly, the printer must be shared on the network so that other computers can connect to it and use it wirelessly. So you have to look for the printer on each computer. The steps to follow for this are described below:
-
Enter "Configuration" on the computer.
-
Select "Hardware and sound".
-
Then, give the option "Hardware and sound".
-
Then to "Devices and Printers."
-
Finally "Add a new printer".
When the printer being shared appears, the following steps are flagged and performed:
-
Click on the icon of the printer that we want to share with the right mouse button.
-
Immediately, an option menu will be displayed, where we must select "Share", then we choose "Share this printer" and later, "Present print jobs on client computer".
-
To finish, select "Apply" and "OK". In this way, the printer will already be shared successfully, and all configured computers will be able to access it to be able to print without being working from each office, they just have to configure it.
Creation of work groups
If this procedure has been followed, ¿How to connect a network printer?, The desired printer will be connected and shared on the network correctly, you only have to share it on the network, that is, so that the other computers that are under the range of the same wireless network, to connect with the printer at any time.
If you want to do this and create a work team, you must follow the following steps:
-
The first thing is to enter your computer and click on the "Configuration" option.
-
Then select "Networks and Internet".
-
Immediately, you must give the option "Work Group" or "Home Group".
-
In this option, you will be indicated if you want to join an existing group or want to create a new group.
-
You should pay attention to verify that the "Printer" option is chosen.
-
Finally, click on "Next" and enter the established password or password, which the group will require.
-
Then click "OK".
Setting up the printer in the workgroup
This is the last stage of ¿How to connect a printer on a wireless network?, make the printer configuration to the workgroup; Completing this stage will be the confirmation that the job has been done correctly and that the printer is properly connected to the network.
So, to perform this last step, we present the procedure below:
-
You must enter the "Control Panel" option.
-
Then, look for the option "Hardware and sound".
-
Immediately, you must click on the "Devices and Printers" button.
-
Once in this option, you must find the one for "Add a new printer".
-
Once the printer is seen as a found device, it must be selected and click on "Next".
-
Finally, it will be seen that a new option is displayed that is to make an impression, which will allow to verify and corroborate that the configuration was effective, and all the steps have been correctly completed.
We look forward to this article on How to connect a network printer? has been useful to you.